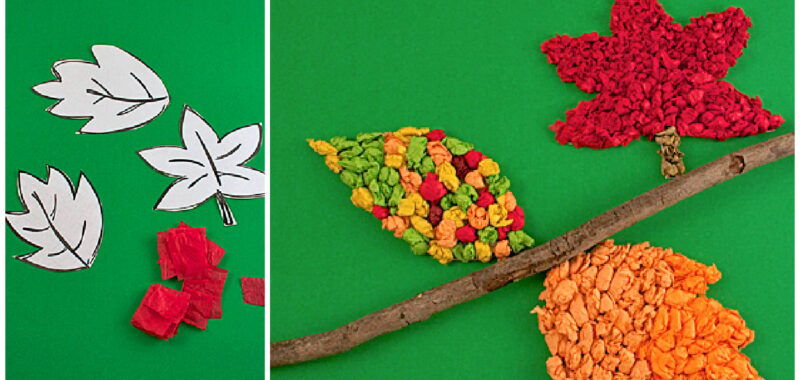
Let’s make tissue paper leaves by crumpling, crinkling and balling autumn colored tissue paper to create both texture and color. Kids of all ages will enjoy this traditional autumn tissue paper craft that works great in the classroom or at home. These tissue paper leaves are the perfect way to celebrate fall.

Crinkle Tissue Paper Leaves Craft for Kids
Tissue paper crafts are really fun because tissue paper can be smoothed, shredded, chopped, crinkled, crumpled, decoupaged and so many other crafty forms of fun!
The fall leaves colors are beautiful and fall is my favorite time of year! This fall craft is easy and fun, but could be altered as a tissue paper craft for spring leaves by just changing the tissue paper colors.
This is an art project that you may remember from your own school days.
This article contains affiliate links.
Watch Our Short How to Make Tissue Paper Leaf Craft Video Tutorial
Supplies Needed for Fall Craft for Kids
- This free fall leaf template printable – or a pencil to outline your fall leaf pattern on regular paper
- Tissue paper in fall colors* – yellow, gold, orange, dark green, light green, light brown, dark brown, red, cranberry and using metallics like gold, bronze, copper and silver can be pretty too!
- White glue
- (optional) Paint brush to spread glue
- Scissors or preschool safety scissors
- (optional) Stick from the backyard to use to attach leaves – you could also use brown tissue paper or brown paint and a paint brush instead
- Background canvas – this craft can be displayed on construction paper, card stock, poster board, painted canvas or on the classroom bulletin board.
*If you are making this with a crowd of kids or enjoy making a lot of tissue paper crafts, check out these pre-cut tissue paper squares which would work great for this fall leaf craft.
Directions to Make Tissue Paper Leaf Craft
Step 1
Print out the leaf template printable and cut out the specific leaf shapes you want to use. If you want larger leaves, then enlarge them by 200% on your printer.
Or using a pencil and paper, outline fall leaf shapes using the pictures seen here as a guide.
Alternatively, go on a walk before doing this craft and choose some leaves from nature to bring back as a template for this fall leaf craft.

Step 2
Cut or tear tissue paper into squares. These do not have to be exactly the same size since they will be crumpled and crinkled.

Step 3
Apply white glue to a small section of one of the leaves. Spread it around liberally or use a paint brush to evenly coat the leaf template surface.

Step 4
Crumple squares into a ball.
For older kids use smaller squares, while younger kids will do better with larger tissue paper pieces.

Step 5
Press the crumpled paper into the glue.
Get creative and use multiple colors if you like.

Step 6
Add a stick to your background and strategically arrange the leaves around it. Alternatively, you could use rolled up brown tissue paper as the tree limb or paint a brown tree limb on the background.
This makes a great classroom activity. Decorate an entire bulletin board to look like a tree with each child responsible for a leaf or two. It is a good collective art project.
Related: Make tissue paper flowers
How to Make Tissue Paper Crinkle Leaves Art

These tissue paper leaves are so easy. You don’t need folded paper, super skills, because it’s not an origami paper craft. While an origami leaf is super cute, you can make leaves using different shapes of leaves that almost look like real leaves. Don’t have tissue paper? Use crepe paper then. Following the simple steps will allow you to make any size of leaf. Make small leaves or big leafs. So grab your pair of scissors, craft glue, and other craft supplies and lets make some pretty tissue paper leaves.
Prep Time
5 minutes
Active Time
15 minutes
Total Time
20 minutes
Difficulty
easy
Estimated Cost
free
Materials
- fall leaf template printable – or a pencil to outline your fall leaf pattern on regular paper
- Tissue paper in fall colors – yellow, gold, orange, dark green, light green, light brown, dark brown, red, cranberry and using metallics like gold, bronze, copper and silver can be pretty too!
- White glue
- (optional) Stick from the backyard to use to attach leaves – you could also use brown tissue paper or brown paint and a paint brush instead
- Background canvas
Tools
- (optional) Paint brush to spread glue
- Scissors or preschool safety scissors
Instructions
- Print out the leaf template or draw your own leaf shapes and cut them out.
- Cut tissue paper into squares.
- Crumple the tissue paper into balls.
- Glue a small area of your first leaf cut out.
- Push the balls gently into the glued surface.
- Continue until you have all the leaf template covered.
- Add a tree branch shape using a stick, tissue paper shape or brown paint on your background.
More Fall Crafts for Kids from Kids Activities Blog
How did your fall tissue paper leaf craft turn out? Did you crinkle or crumple the tissue paper {Giggle}?