Older school-aged kids will use watercolors to paint a picture of rocks in this fun project. These basic techniques can easily be used at home or in the classroom.

Combining Watercolor Techniques
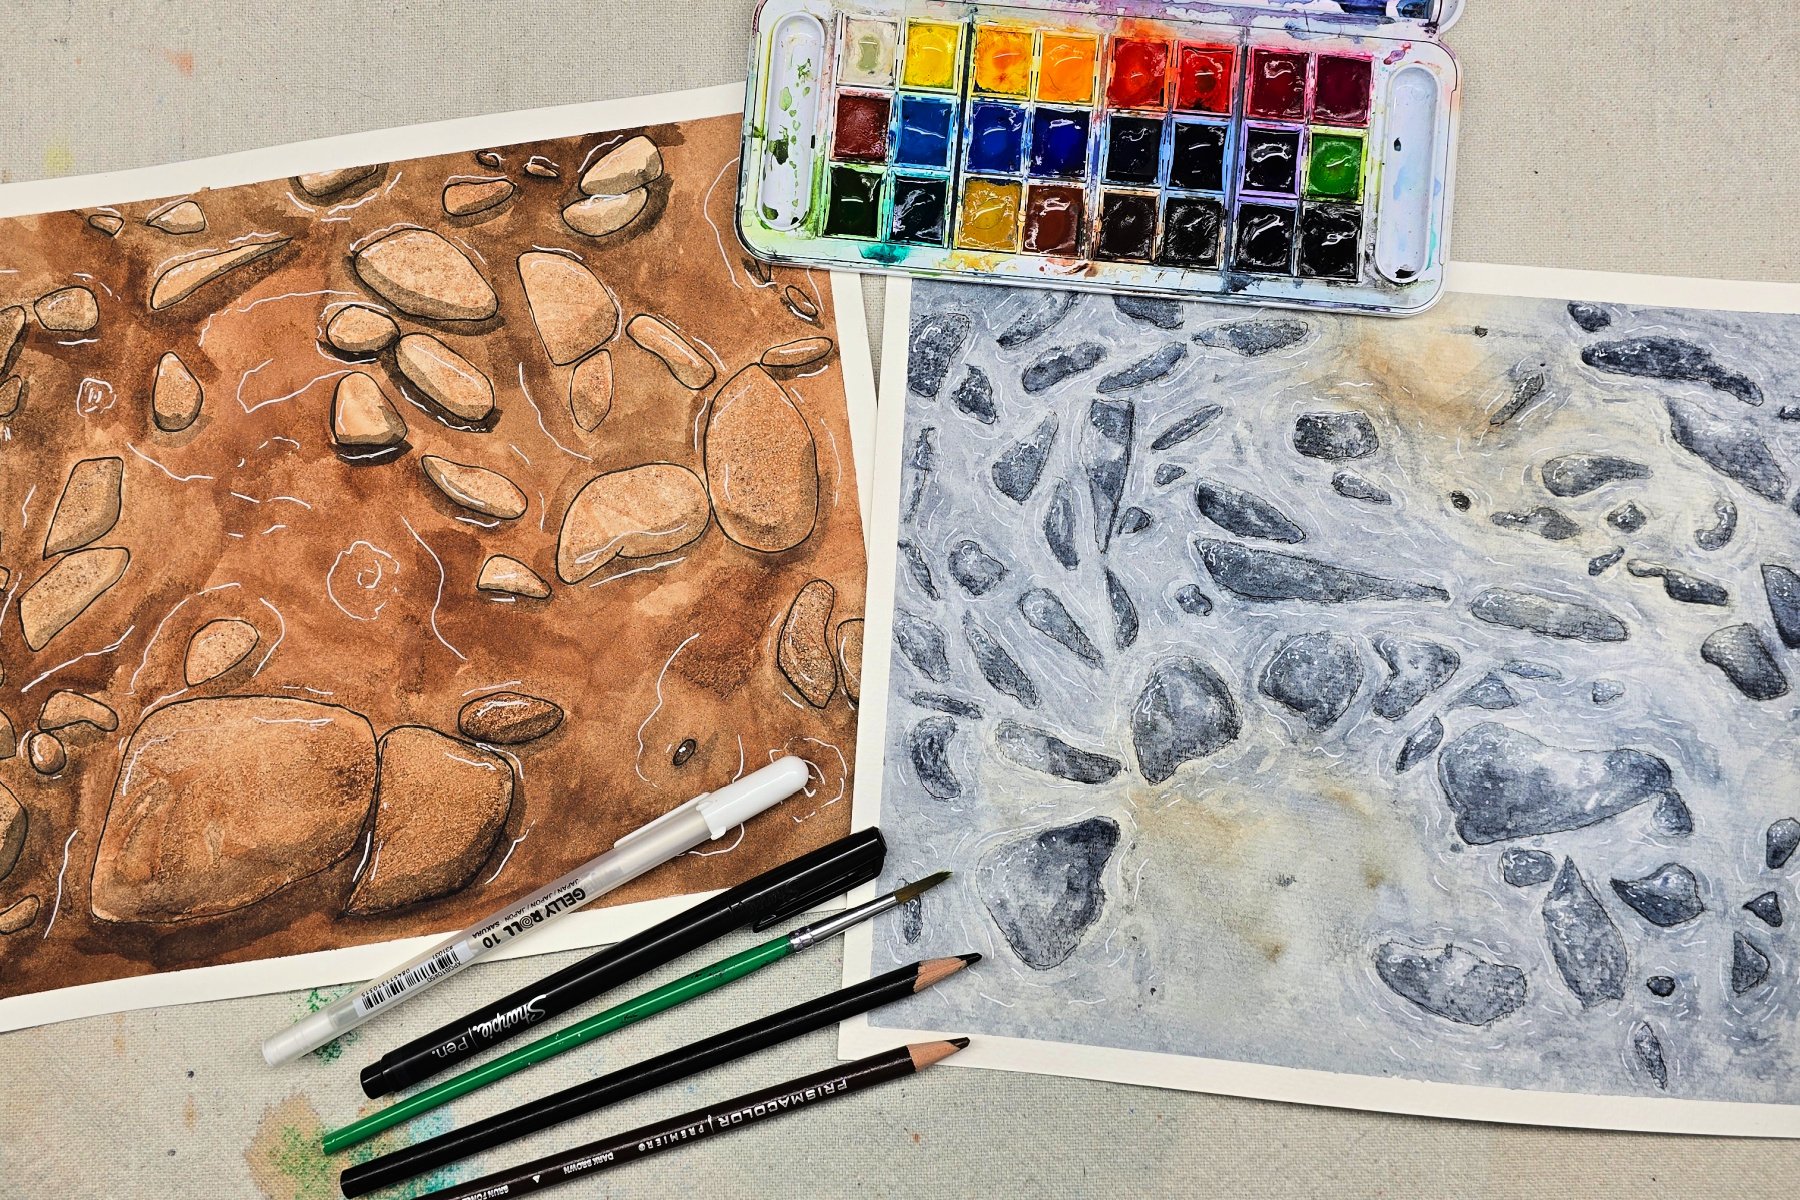
This project combines a few fun watercolor techniques. To begin the background, we use a watercolor technique of blending wet paints. Then, we cover the wet paint with plastic wrap as it dries to create an interesting effect. Finally, we will layer watercolors and create more details in our rock design.
Related: Explore more fun watercolor techniques with our free printable.
Supplies Needed to Make this Watercolor Rocks Art Project

- Watercolor Paper
- Watercolor Paints
- Paintbrushes
- Colored Pencils
- White Gel Pen, Correction Pen, or Paint Pen
- Plastic Wrap
- Water
- Paper Towels
- Washi Tape – or Painter’s Tape
- Flat Surface – to Paint on
Directions to Painting Watercolor Rocks
Prepping Your Supplies
- Tear off one to two pieces of plastic wrap and keep nearby. Pieces need to be long enough to fully cover the watercolor paper.
- Wet watercolor paints to prepare them for use.
Step 1

First, use washi tape to attach watercolor paper to cardboard. This will create a border for your painting and reduce paper bowing.
Step 2

Note: Steps 2-4 must be completed quickly for the techniques to work.
Wet the entire surface of your paper with clean water. This can be done with a large paintbrush or by spraying clean water onto the paper with a spray bottle. Again, work quickly here! The paper needs to still be wet for the next step.
Step 3

While the paper is still wet, quickly apply watercolors to create a base layer of paint. Remember, work quickly! The paints need to be wet to blend, and still be wet for the next step.
Step 4

Then, cover painting with plastic wrap. Do not smooth the plastic wrap out flat. The wrinkles will create the base shapes for the rocks.
Leave the plastic wrap on the paper and set aside to dry.
Step 5

When the paper is dry, remove plastic wrap and lightly outline shapes to begin creating the rocks.
Step 6

Add watercolor to create a more uniform rock shape.
Step 7

Then, use watercolors to darken the areas around the rocks. Paint in short wavy sections around your rocks to create a water ripple effect.
Step 8

Next, use watercolor to add deeper shadows to the rocks. Tap a darker shade of paint onto the rocks with the paintbrush, creating a stippling effect. This technique helps create more of a rough rocky texture.
Step 9

When paint is dry, use a white gel pen to add highlights to the rocks and water. Use a stippling (dotting) technique for highlights on the rocks. To highlight the water, add small wavy lines that loosely follow the shapes of the ripples painted in step 7.
Finished Watercolor Rocks Art Project

Our watercolor rock paintings look wonderful! Since these projects are made on paper, they can easily be framed, clipped, or displayed in your preferred style.
Our Experience Making this Watercolor Rocks Art Project
I love art projects that allow me to combine various techniques. This project can feel a bit rushed in the beginning when applying paint and plastic wrap. I have fun with this portion of my class encouraging students to work faster and letting go of their perfectionist tendencies. Students are to simply focus on getting paints on the paper and putting the plastic wrap down in a quick, carefree way.
The second portion of this project allows kids a chance to develop their shading skills and spend a bit more time on details. Though this project uses basic watercolor techniques, kids can easily create wall worthy art. I especially love the clean look of the border created by the washi tape!
Prep Time
5 minutes
Active Time
25 minutes
Additional Time
2 hours
Total Time
2 hours 30 minutes
Difficulty
Medium
Estimated Cost
$1
Materials
- Watercolor Paper
- Plastic Wrap
Tools
- Watercolor Paints
- Paintbrushes
- Colored Pencils
- White Gel Pen, Correction Pen, or Paint Pen
- Water
- Paper Towels
- Washi Tape – or Painter’s Tape
- Flat Surface – to Paint on
Instructions
Prepping Your Supplies
- Tear off one to two pieces of plastic wrap and keep nearby. Pieces need to be long enough to fully cover the watercolor paper.
- Wet watercolor paints to prepare them for use.
- Use washi tape to attach watercolor paper to cardboard, creating a border around the paper.
- Note: Steps 2-4 must be completed quickly for the techniques to work. Wet the entire surface of your paper with clean water. This can be done with a large paintbrush or by spraying clean water onto the paper with a spray bottle. Work quickly! The paper needs to still be wet for the next step.
- While the paper is still wet, quickly apply watercolors to create a base layer of paint. Again work quickly! The paints need to be wet to blend, and still be wet for the next step.
- Cover painting with plastic wrap. Do not smooth the plastic wrap out flat. The wrinkles will create the base shapes for the rocks. Leave the plastic wrap on the paper and set aside to dry.
- When the paper is dry, remove plastic wrap and lightly outline shapes to begin creating the rocks.
- Add watercolor to create a more uniform rock shape.
- Use watercolors to darken the areas around the rocks. Paint in short wavy sections around your rocks to create a water ripple effect.
- Use watercolor to add deeper shadows to the rocks. Tap a darker shade of paint onto the rocks with the paintbrush, creating a stippling effect for a rough, rocky texture.
- When paint is dry, use a white gel pen to add highlights to the rocks and water. Use a stippling (dotting) technique for highlights on the rocks. To highlight the water, add small wavy lines that loosely follow the shapes of the ripples painted in step 7.
Other Fun Watercolor Art Projects from Kids Activities Blog
Did your kids like using the plastic wrap technique? Were they pleased with their watercolor rocks creations?