School-aged kids will learn how to apply form to their art by drawing a few simple 3D shapes in this project. This technique can easily be used at home or in the classroom.

Exploring 3D shapes and Form
Artists use many techniques to create the illusion of 3D shapes. We will explore some of them in this project by using curved lines along with shadows and highlights. When kids understand lines and shading, they can draw a simple circle and then give it the appearance of a sphere. This element of art is known as “form.”
Painters create the appearance of form on a flat surface by using light, shadow, the appearance of an object’s contours, negative space, and the surrounding objects around the subject matter.MasterClass
Related: Further practice form with various shading techniques.
Supplies Needed to Make This 3D Shapes and Form Art Project

- Watercolor Paper
- Pencil
- Permanent Marker
- Watercolor Paints
- Paintbrushes
- Water
- Paper Towels
Directions to Drawing 3D Shapes and Form
Step 1

First, use a pencil to draw a circle in the upper left portion of your paper. Tip: Trace a round object; such as the bottom of your water cup, to easily create a circle.
Step 2

Next to the circle, draw a triangle with a curved bottom. This will be the beginning of our 3d cone-shaped drawing.
Step 3

In the lower left portion of the page, use the pencil to draw a cylinder shape. To easily draw a cylinder: first draw a short and wide shaped oval, then draw two lines down from the smallest “ends” of the oval, and finally, connect the bottom of the lines with a curved line. The bottom curved line needs to match the curve of the oval at the top of the cylinder.
Step 4

Next, use a pencil to draw a ring torus, or donut shape, in the lower right portion of the page. We traced the bottom of a cup and smaller medicine bottle to easily create this outline.
Step 5

Add curved lines to all of your shapes. These curves need to follow the curve that we wish to imply on the shape.
For example:
- Across the sphere, draw lines that curve up and then down (like a rainbow) on the top half, and lines that curve down and then up on the lower half (making the rainbows upside down).
- For the cone and cylinder, simply duplicate the curve shape drawn at the bottom, making curved lines up to the top of the shape.
- The torus, or donut, shape will be covered in small C-shaped lines.
Step 6

Then, trace drawings using a permanent marker and erase unwanted pencil lines.
Step 7

Next, use a wet-on-wet watercolor technique to add shadows and highlights to your shapes. To create this technique, paint the entire shape with water. While the water is still wet, add watercolor paint only to the edges of the shape. The watercolor paint should bleed into the clear water and create a shadow and highlight effect to further add form to your shapes.
Step 8

Finally, if desired, paint the background on the page once shapes are dry. We chose to paint with the wet-on-wet technique over the entire background. Keep in mind that the shapes need to be dry or the background watercolor paint can bleed into the shapes.
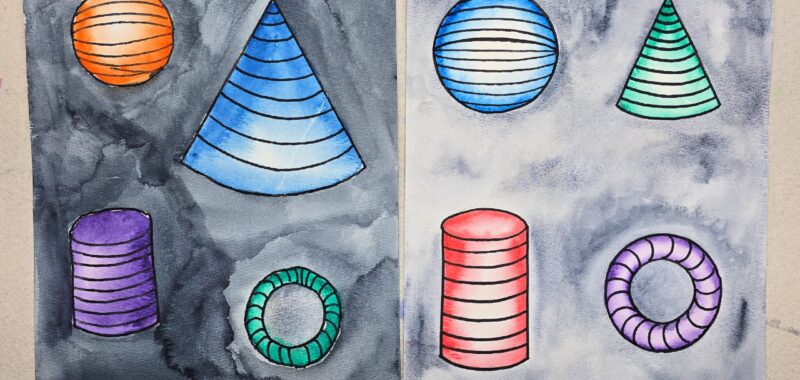
Finished Drawing 3D Shapes Art

I love how these practice pages turned into wall-worthy art! Since these projects are made on paper, they can easily be framed, clipped, or displayed in your preferred style.
Our Experience Making this Drawing 3D Shapes Art Project
This project is a great way to introduce kids to adding form to their artwork. This project shows how easily the curve of a line can alter the appearance of a shape. As well as altering shapes by adding a few simple highlights and shadows. With the center of the shapes being colorless, it further adds form to the shape with implied highlights and shadows.
Prep Time
5 minutes
Active Time
25 minutes
Total Time
30 minutes
Difficulty
Medium
Estimated Cost
$1
Tools
- Pencil
- Permanent Marker
- Watercolor Paints
- Paintbrushes
- Water
- Paper Towels
Instructions
- Use a pencil to draw a circle in the upper left portion of your paper. Tip: Trace a round object; such as the bottom of your water cup, to easily create a circle.
- Next to the circle, draw a triangle with a curved bottom. This will be the beginning of our 3d cone-shaped drawing.
- In the lower left portion of the page, use the pencil to draw a cylinder shape. To easily draw a cylinder: first draw a short and wide shaped oval, then draw two lines down from the smallest “ends” of the oval, and finally, connect the bottom of the lines with a curved line. The bottom curved line needs to match the curve of the oval at the top of the cylinder.
- Draw a ring torus, or donut shape, in the lower right portion of the page. We traced the bottom of a cup and smaller medicine bottle to easily create this outline.
- Add curved lines to all of your shapes. These curves need to follow the curve that we wish to imply on the shape.
- Trace drawings using a permanent marker and erase unwanted pencil lines.
- Use a wet-on-wet watercolor technique to add shadows and highlights to your shapes. To create this technique, paint the entire shape with water. While the water is still wet, add watercolor paint only to the edges of the shape. The watercolor paint should bleed into the clear water and create a shadow and highlight effect to further add form to your shapes.
- If desired, paint the background on the page once shapes are dry. We chose to paint with the wet-on-wet technique over the entire background. Keep in mind that the shapes need to be dry or the background watercolor paint can bleed into the shapes.
Other Fun watercolor Art Projects from Kids Activities Blog
Did your kids enjoy drawing these 3D shapes? What other ways can they think to add form to their artwork?